(Updated 2024: authentik’s helm chart has received substantial refactoring, and among other things the service name changed from authentik to authentik-server. The yaml snippets in this text have been adapted to reflect the changes.)
The past week I had fun with setting up Istio on my Kubernetes cluster, and adding an authentication/authorization solution to the ingress. Mission accomplished: now I can manage users and groups and whatnot at a fine-grained level on all ingress to any app in my cluster, while keeping Istio’s allow-nothing base rule in place. All traffic in the cluster (ingress and inter-service) is forbidden unless explicitly whitelisted. Authentication and authorization happen at the ingress, before it even gets to any service hiding deep inside the Kubernetes cluster.
I had some challenges to overcome, and I had a hard time collecting all the necessary information in one place, to get a full picture of what I had to do. Hence I am writing it down, and why not share it with the world.
First challenge: choosing the tools
For the service mesh, I looked at Istio, Linkerd, and Open Service Mesh (OSM). For user management and authentication/authorization services (because well, they are indeed two separate things), I looked at Keycloak and Authentik (user management and authentication/authorization in one), and at Authelia, Pomerium and Apache APISIX (each for authentication/authorization, but in need of a separate service for the user management).
I got things working with Istio and Authentik. You may get lucky with any other combination, I am just telling what worked for me and what other options I decided not to go for. I am not going to claim that the other options are bad or do not work, but I can tell you that they did not satisfy me.
Istio
Istio is a service mesh. It implements mTLS for you, and it takes very little effort to setup and enable. You quickly get running with a cluster where all traffic between nodes is nicely encrypted. Not bad!
It also comes with its own ingress controller. I do not know if there is any reason to choose Istio’s ingress over another solution, but I figured it would be a wise decision to mix as few packages as I can.
Istio adds a sidecar to every pod in your cluster, which acts as a gateway for all network communication for that pod. This allows istio to enable mutual TLS (mTLS) for all pods, and it also means that you have the possibility to write rules for what traffic is allowed or not: AuthorizationPolicies.
The default mTLS configuration works fine, so that took no effort, but the AuthorizationPolicies are unavoidably customized to your cluster, so that took some reading.
Authentik
Authentik is awesome. Because it just works, and for a project like mine, it covers all I need. Have a look at this comparison chart, which might convince you to pick Authentik over Keycloak. It lets you manage users and groups, as well as applications (clients). Once you have clients defined, each user gets a landing page with links to all clients they have access to. It integrates very well with Istio’s ingress controller (if you make no typos in the configuration).
Second challenge: understanding how these tools work
Istio AuthorizationPolicy
It took me a while to figure out how Istio’s AuthorizationPolicies work, and most importantly, what the rules are when multiple policies exist. It is actually very well explained in this diagram. It took me days to actually find it in Istio’s documentation. Let me show a copy here:

One misunderstanding I initially had, was that a CUSTOM policy would play the roles of both DENY and ALLOW. But, as you can see in the tree, it really is a DENY rule with a custom decision, where custom means that the decision is taken by another service. If your CUSTOM policy decides not to deny someone entry (that is, you allow entry), the request can still be denied by the DENY and ALLOW policies further down the tree! That is important. So:
Authentik configuration
This documentation page of Authentik got me started with the configuration of istio. But I did not really understand how to add a client (service) to Authentik until I found this blogpost, which states:
Most newcomers usually get lost juggling these three.
These three, refers to Application, Provider and Outpost. You must configure all three in Authentik’s UI (or with its API, but the point is that Authentik needs to be live), before you can use secure your application. The Application is your service that you want to secure, you give it a name and an icon and so one. The Provider tells Authentik how the public and private URLs of your application are connected, and finally the Outpost is the actual service which Authentik exposes to your service which needs to know if someone is authorized or not. I suggest you read that blogpost I referred to above.
The answer
Here’s the configuration that works for me.
Istio
I use the Helm installation of Istio, and this is my values.yaml for istiod:
 1global:
 2  logging:
 3    level: "default:debug"
 4  proxy:
 5    logLevel: debug
 6
 7meshConfig:
 8  defaultConfig:
 9    discoveryAddress: istiod.istio-system.svc:15012
10    tracing:
11      zipkin:
12        address: zipkin.istio-system:9411
13  enablePrometheusMerge: true
14  rootNamespace: null
15  trustDomain: cluster.local
16  extensionProviders:
17  - envoyExtAuthzHttp:
18      headersToDownstreamOnAllow:
19      - cookie
20      headersToUpstreamOnAllow:
21      - set-cookie
22      - x-authentik-*
23      includeRequestHeadersInCheck:
24      - cookie
25      pathPrefix: /outpost.goauthentik.io/auth/envoy
26      port: 80
27      service: authentik-server.authentik.svc.cluster.local
28    name: authentik
Note that there is one small but crucial difference with the documentation page of Authentik: the port to which Istio’s ingress queries for the custom decision, must be the port which is exposed in your cluster. As I am using Kubernetes, this corresponds to the targetPort of the authentik service. This is opposed to the port 9000 in the documentation, which is internally the port which authentik listens on. Check which port you need for your usecase.
Note too, that I had made a copy/paste typo, which took me a day to uncover. My mistake was in the includeRequestHeadersInCheck field: all request were going very well and were directed to authentik, I could login, but then.. I got a redirection loop. Because of the wrong value in the header name, my authentication header was not correctly communicated to Authentik.
The next challenge, was to get all the firewall rules (AuthorationPolicy) to work correctly.
This is my setup.
AuthorizationPolicy
1# this disallows everything:
2# https://istio.io/latest/docs/concepts/security/#allow-nothing-deny-all-and-allow-all-policy
3apiVersion: security.istio.io/v1beta1
4kind: AuthorizationPolicy
5metadata:
6  name: allow-nothing
7  namespace: istio-system
8spec:
9  action: ALLOW
1apiVersion: security.istio.io/v1beta1
2kind: PeerAuthentication
3metadata:
4  name: "default"
5  namespace: istio-system
6spec:
7  mtls:
8    mode: STRICT
 1apiVersion: security.istio.io/v1beta1
 2kind: AuthorizationPolicy
 3metadata:
 4  name: authentik-ingress-istio
 5  namespace: istio-ingress
 6spec:
 7  action: ALLOW
 8  rules:
 9  - to:
10    - operation:
11        hosts:
12        - auth.localhost
13        - auth.localhost:443
14        - auth.localhost:80
15  selector:
16    matchLabels:
17      app: istio-ingressgateway
 1apiVersion: security.istio.io/v1beta1
 2kind: AuthorizationPolicy
 3metadata:
 4  name: authentik-ingress-allow
 5  namespace: authentik
 6spec:
 7  action: ALLOW
 8  rules:
 9  - from:
10    - source:
11        principals:
12        - cluster.local/ns/istio-ingress/sa/istio-ingressgateway
13    to:
14    - operation:
15        hosts:
16        - auth.localhost
17        - auth.localhost:*
where auth.localhost is the public fully-qualified domain name (FQDN) to reach my instance of Authentik.
 1apiVersion: security.istio.io/v1beta1
 2kind: AuthorizationPolicy
 3metadata:
 4  name: authentik-allow-databases
 5  namespace: authentik
 6spec:
 7  action: ALLOW
 8  rules:
 9  - from:
10    - source:
11        principals:
12        - cluster.local/ns/authentik/sa/authentik
13    to:
14    - operation:
15        ports:
16        - "5432"
17        - "6379"
18        - "9100"
19        - "80"
20  - from:
21    - source:
22        principals:
23        - '*'
24    - operation:
25        ports:
26        - "80"
This rule allows authentik to reach all necessary ports, and it allows everyone to reach authentik on port 80. If you have replicated databases (redis and postgresql), you have to add the rules which allow these replicas to communicate with each other.
 1apiVersion: security.istio.io/v1beta1
 2kind: AuthorizationPolicy
 3metadata:
 4  name: httpbin-ingress-istio
 5  namespace: istio-ingress
 6spec:
 7  action: ALLOW
 8  rules:
 9  - to:
10    - operation:
11        hosts:
12        - httpbin.localhost
13        - httpbin.localhost:443
14        - httpbin.localhost:80
15  selector:
16    matchLabels:
17      app: istio-ingressgateway
 1apiVersion: security.istio.io/v1beta1
 2kind: AuthorizationPolicy
 3metadata:
 4  name: httpbin-ingress-custom
 5  namespace: httpbin
 6spec:
 7  action: CUSTOM
 8  provider:
 9    name: authentik
10  rules:
11  - to:
12    - operation:
13        hosts:
14        - httpbin.localhost
15        - httpbin.localhost:*
where httpbin.localhost is the FQDN at which httpbin can be reached.
Gateway
 1apiVersion: networking.istio.io/v1beta1
 2kind: Gateway
 3metadata:
 4  name: authentik-ingress
 5  namespace: istio-ingress
 6spec:
 7  selector:
 8    istio: ingressgateway
 9  servers:
10  - hosts:
11    - auth.localhost
12    port:
13      name: http
14      number: 80
15      protocol: HTTP
16    tls:
17      httpsRedirect: true
18  - hosts:
19    - auth.localhost
20    port:
21      name: https
22      number: 443
23      protocol: HTTPS
24    tls:
25      credentialName: authentik-ssl-certificate-secret
26      mode: SIMPLE
27---
28apiVersion: networking.istio.io/v1beta1
29kind: VirtualService
30metadata:
31  name: authentik-ingress
32  namespace: istio-ingress
33spec:
34  gateways:
35  - authentik-ingress
36  hosts:
37  - auth.localhost
38  http:
39  - match:
40    - uri:
41        regex: ^\/[^\.]+.*
42    route:
43    - destination:
44        host: authentik-server.authentik.svc.cluster.local
45        port:
46          number: 80
47  - match:
48    - uri:
49        exact: /
50    redirect:
51      uri: /if/user
 1apiVersion: networking.istio.io/v1beta1
 2kind: Gateway
 3metadata:
 4  name: httpbin-ingress
 5  namespace: istio-ingress
 6spec:
 7  selector:
 8    istio: ingressgateway
 9  servers:
10  - hosts:
11    - httpbin.localhost
12    port:
13      name: http
14      number: 80
15      protocol: HTTP
16    tls:
17      httpsRedirect: true
18  - hosts:
19    - httpbin.localhost
20    port:
21      name: https
22      number: 443
23      protocol: HTTPS
24    tls:
25      credentialName: httpbin-ssl-certificate-secret
26      mode: SIMPLE
27---
28apiVersion: networking.istio.io/v1beta1
29kind: VirtualService
30metadata:
31  name: httpbin-ingress
32  namespace: istio-ingress
33spec:
34  gateways:
35  - httpbin-ingress
36  hosts:
37  - httpbin.localhost
38  http:
39  - match:
40    - uri:
41        prefix: /outpost.goauthentik.io
42    route:
43    - destination:
44        host: authentik-server.authentik.svc.cluster.local
45        port:
46          number: 80
47  - match:
48    - uri:
49        regex: ^\/[^\.]+.*
50    - uri:
51        exact: /
52    route:
53    - destination:
54        host: httpbin.httpbin.svc.cluster.local
55        port:
56          number: 14001
As you can tell from these two ingress configurations, I am using cert-manager with HTTP01 challenges: I do not match any path starting with a dot in both VirtualServices, but I do match anything else including the exact / path.
Configuring a client for httpbin in Authentik
Before configuring Authentik, if you go to the url of your service, you should get this result if everything was setup correctly:
1{
2    "Message": "no app for hostname",
3    "Host": "httpbin.localhost",
4    "Detail": "Check the outpost settings and make sure 'httpbin.localhost' is included."
5}
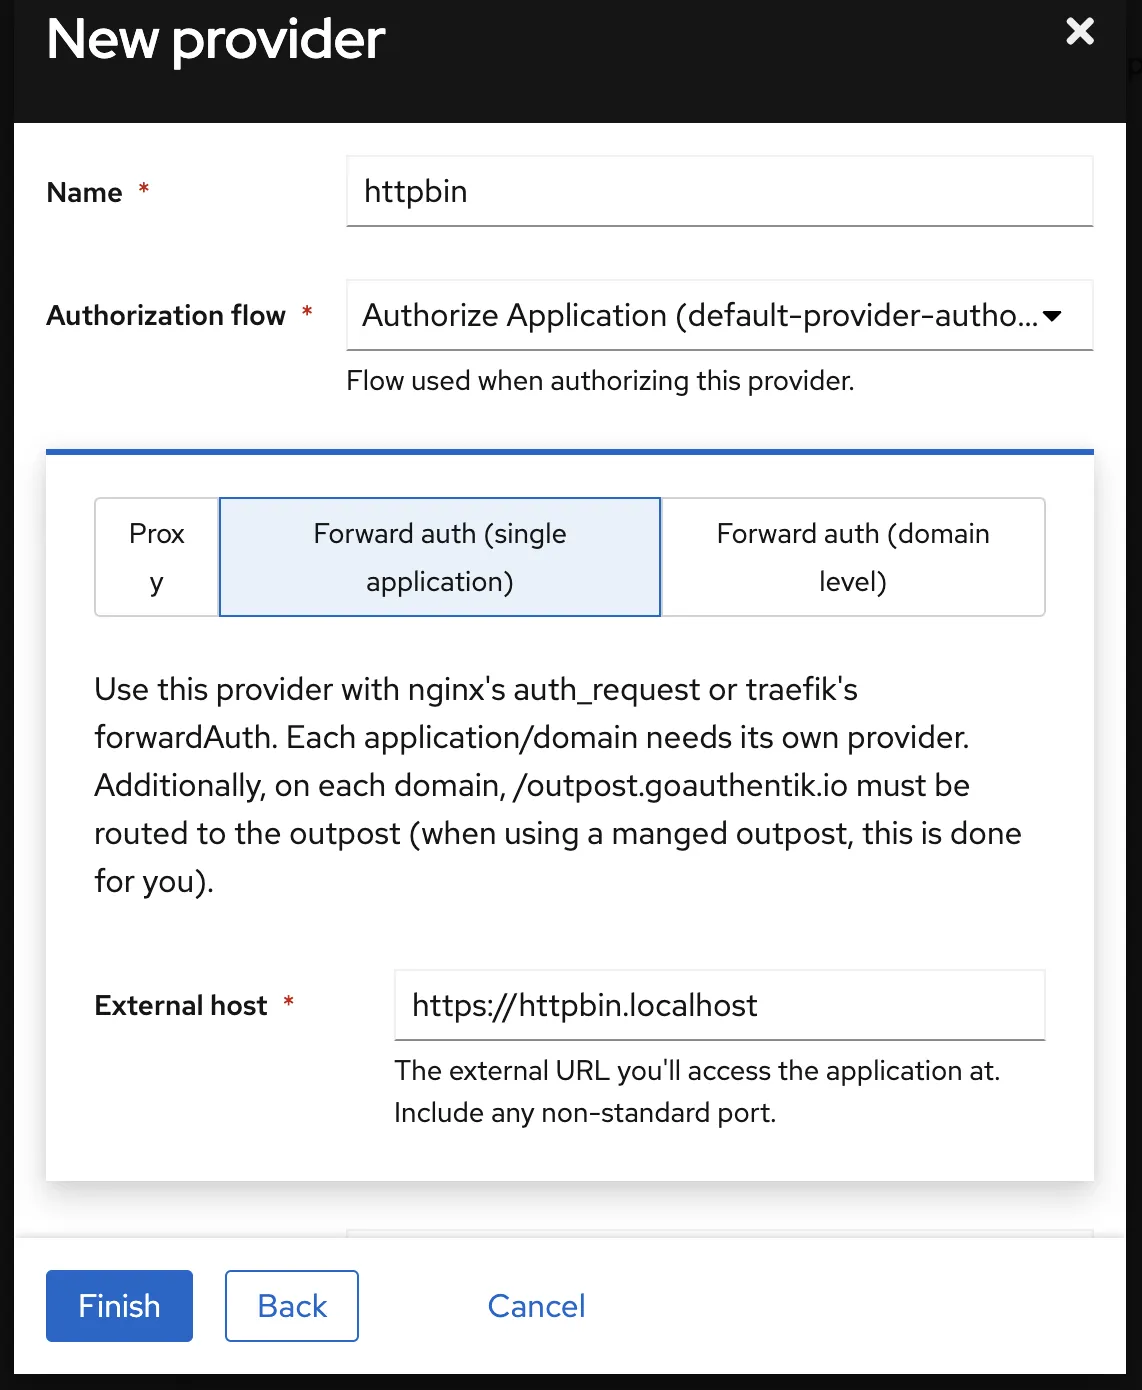
I still need to build a solution where this is scripted [1], but for now I do it in the UI of Authentik. This mostly follows the aforementioned blogpost. In the admin interface, create a new application. There is not much you can do wrong here. While creating the application, you can create (and then select!) a Provider. For our setup with Istio ingress, it is paramount that you create a Proxy Provider ! Nothing else. And in configuring the proxy provider, it is paramount that you select Forward auth (single application) for our setup, nothing else. At the time of writing, your correct provider configuration looks like this:
Finally, as per the manual, we go to Outposts in the admin interface, and edit the authentik Embedded Outpost by selecting the application we just created, and save the Outpost. If your application is not there, maybe you forget to connect the Application to its Provider.

That’s it.
Now, if you navigate to your service, you should see it just fine. If you open a private window and go to the service, you should be redirected to Authentik’s login panel, after which you should be redirected back to the service ready for you to use.
Please leave a comment if you think this setup can be improved, or if something is not clear yet!
Footnotes
[1] If you use terraform, do checkout authentik's terraform provider which lets you automate exactly this kind of configuration. Also blueprints can get you a long way.